
Curtain Wall Mock-Up – Shedding Light in the Office
How (and Why) we Built a Curtain Wall Mock-Up
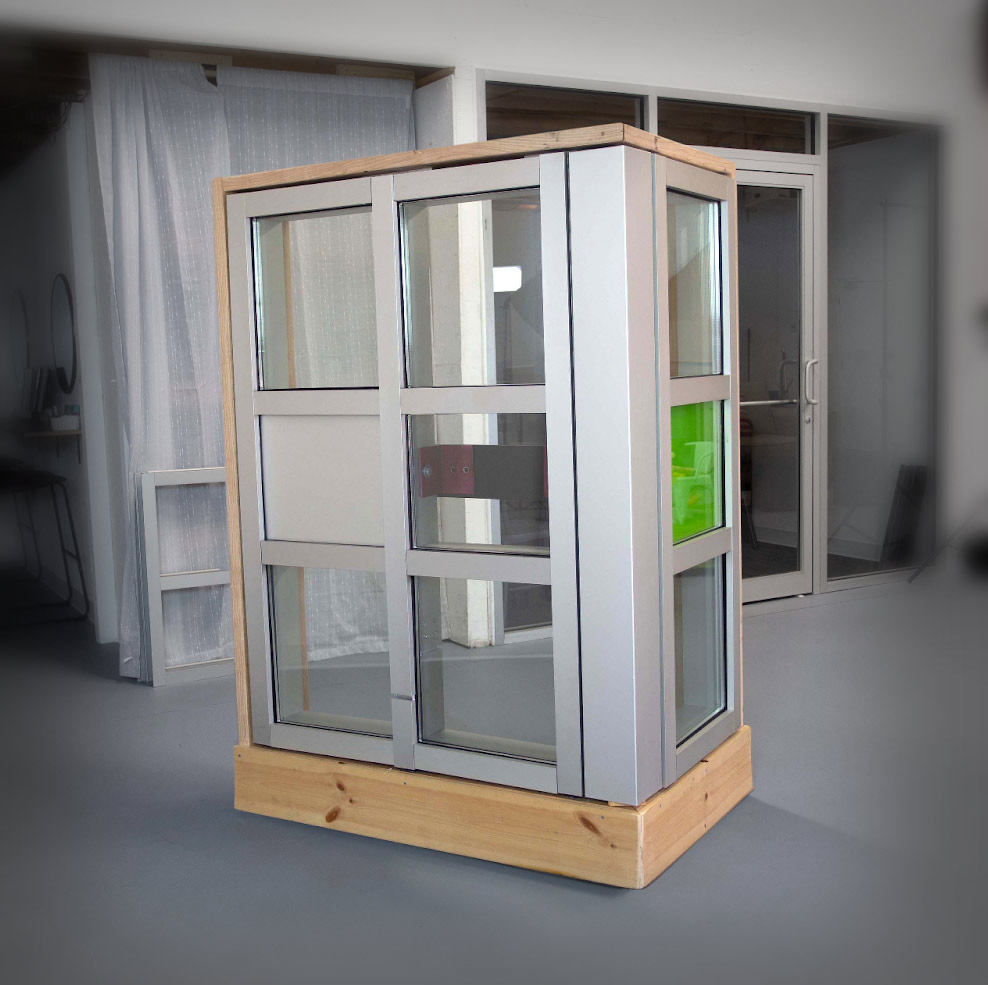
Over at our sister company, MP Drafting, we recently put together a mock-up of a full curtain wall assembly system. While much smaller than an installed system, it has all the functional components a curtain wall needs.
You can see the finished product in the photo below and check out our video at the end of this article to watch the project from start to finish. But first, read on to learn why we built it and what we learned from the experience, including how it has helped us avoid some common mistakes.

Why we built a curtain wall mock-up
You might be wondering why we decided to construct a curtain wall assembly to store inside our shop. Aside from the fact that it’s a great conversation piece, we actually have a few practical reasons for building it.
We wanted to have a tangible representation of a curtain wall system and its various components to improve our drafting process. Our drafters spend so much time looking at curtain wall components in 2D drawings, but not nearly as much time actually seeing and getting their hands on the actual parts they’re drawing. So we wanted to give our drafters, especially those with less experience, a more intimate understanding of curtain walls and their components. There are several important reasons for this.
If you think about it, drafting is kind of like painting (but not the abstract kind). In both cases, you’re creating a 2D representation of something 3D in the real world. To do this properly, an artist needs to study their subject. Of course, you can paint a landscape, for example, without ever having been there, but the accuracy of your representation will suffer.
It’s the same with drafting. You can draw standard wind load or dead load clips, but if you don’t understand how they actually work, and if you’ve never actually seen them, you’re likely to make mistakes. Creating high-quality shop drawings is all about accuracy and attention to detail.
Another reason for building the mock-up was to avoid costly mistakes we’ve made in the past. For example, a common mistake drafters make is improperly showing wind load and dead load clips, splits, and F&T clips.
Seeing these components properly installed on the mock-up has helped our drafters draw these complex details.
In fact, the mock-up includes several details and conditions that are particularly challenging to draw, including brake metal corners, splice sleeves, dead load anchors, wind load anchors, spandrel glass, and F&T clips.
Since the mock-up was built, our drafters have referred to it at least once a week. We also use it for onboarding new drafters. We show them the components, how they look in real life compared to a 2D drawing, and talk about the individual components that comprise the curtain wall.
What we learned from the process
Building the mock-up was a great learning experience. It really cemented some key concepts for those involved, including how to properly locate shear blocks and weep holes, and figuring out the sequence of F&T clips.
Another realization was just how much more difficult it would be to install a curtain wall on a much larger scale. For example, perfectly aligning the holes from the mullions and shear blocks is challenging enough; just imagine doing it from a lift – or outside in the cold during the winter! That would introduce a whole new set of challenges.
This experience opened our eyes to the challenges installers go through on a daily basis. And it emphasized the importance of making their jobs as seamless as possible. The best way we can do that is to create clear, concise, and accurate drawings. If we can do that successfully, we can remove any ambiguity and make the installation process as smooth as it can be. As a result, we’ll save time by avoiding mistakes in the first place and producing a better product.
See for yourself
Watch the full video below to see the project step by step, including some of the key challenges we faced and how we solved them.