
How to Install and Adjust a Commercial Door Closer on a Storefront Door
Why the door closer matters
A commercial door closer is there to control the door’s movement and make sure it returns to the closed position consistently. On storefront and entrance systems, that means more than convenience.
A properly installed closer helps:
- Control door closing speed
- Prevent slamming
- Ensure the door latches correctly
- Reduce wear on hardware
- Improve the user experience at the opening
- Support a cleaner, more professional final result
It is one of those components that people only notice when it is not working right.
Before you install: choose the right mounting method
One of the most useful parts of Alex’s video is that he does not jump straight into installation. He starts with the bigger question first: which closer mounting method makes the most sense for the application?
That step is often overlooked. Installers can get used to doing the same setup over and over, but the door, frame, and job conditions should drive the choice.
The three common closer mounting methods covered in the video are:
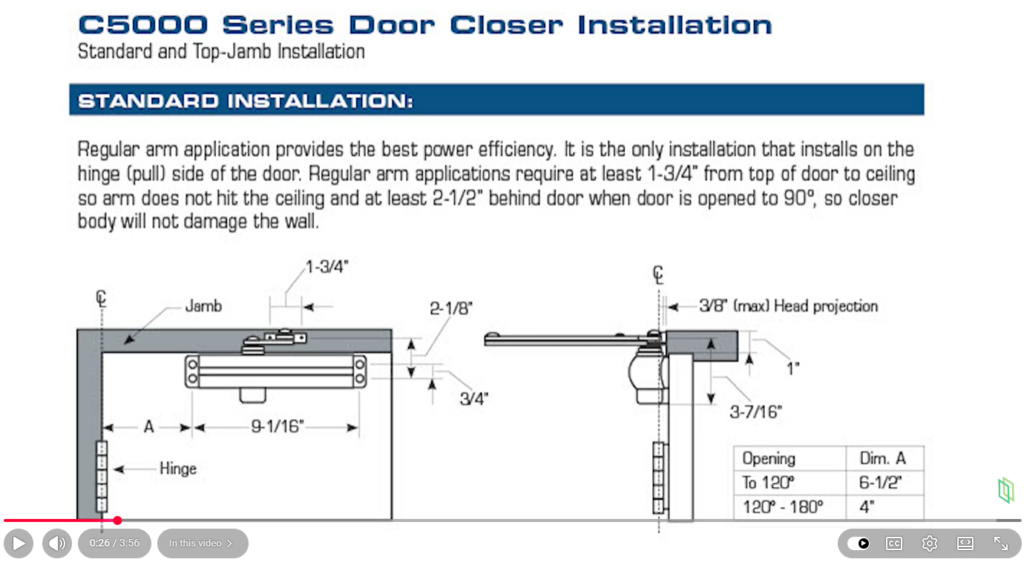
1. Standard arm installation
This method is typically the most power-efficient option. It is common because it gives strong closing force and dependable performance.
Advantages:
- Strong power efficiency
- Common and proven method
- Can be installed on the pull side in some applications
Limitations:
- Can be a poor fit for narrow stile doors
- May require a drop plate in some situations
- Drop plates can create a bulkier look
For installers, this is often the first option to consider, but not always the best-looking or best-fitting option on a narrow stile storefront door.
2. Top jamb installation
This is the method Alex uses in the video, and for good reason. It is one of the most common and practical alternatives to a standard arm installation, especially on narrow stile doors.
Advantages:
- Works well on the pull side of the door
- Good functionality
- Common in storefront applications
- Better suited for narrow stile doors
Limitations:
- Requires careful layout and arm alignment
- Still needs proper adjustment to perform well
If you are working with a narrow stile aluminum entrance and need a clean, functional setup on the pull side, top jamb installation is often the right call.

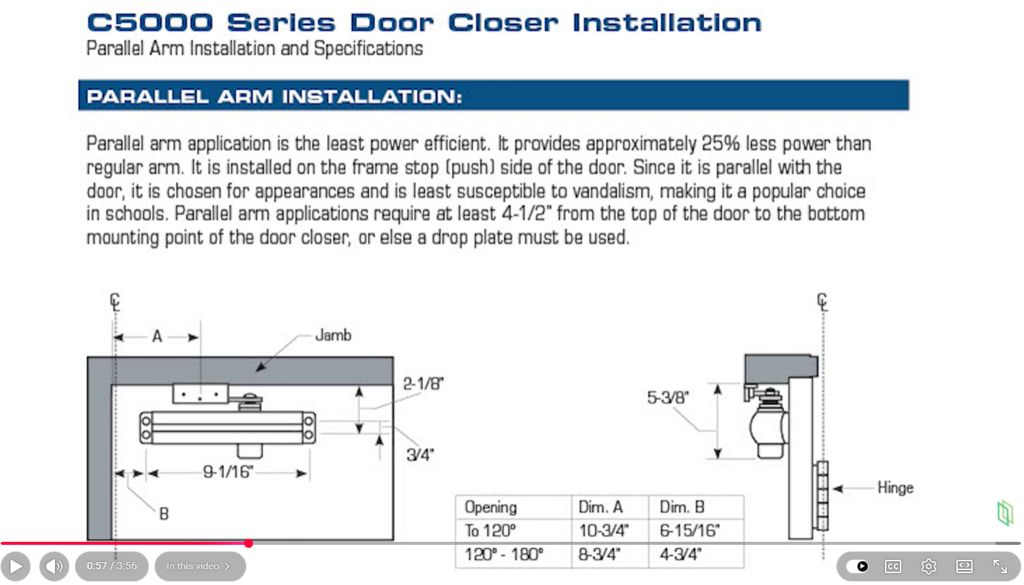
3. Parallel arm installation
This method is popular because it looks cleaner. The arm tucks up into the closer and does not project out in the same way.
Advantages:
- Cleaner appearance
- Less exposed hardware
- Less likely to be vandalized
Limitations:
- Least power-efficient of the three
- Not suitable for narrow stile doors
- Typically limited to push-side applications
There are definitely jobs where the appearance and protection of a parallel arm closer make sense. But if you are dealing with a narrow stile storefront door on the pull side, it is usually not your best option.
Why top jamb installation is so common
Top jamb closers show up all the time in storefront work because they balance performance and practicality.
In the kind of application shown in the LearnGlazing mock-up, the top jamb method checks several important boxes:
- It works with the pull-side condition
- It fits the door style better than some alternatives
- It avoids the awkward look of added hardware plates in many cases
- It gives installers a reliable way to finish out the entrance
That combination makes it a go-to choice for many aluminum entrance installations.
How to install a top jamb door closer
Step 1: Review the manufacturer instructions
This sounds obvious, but it is worth stating clearly: always start with the closer manufacturer’s template and instructions.
Even when a closer looks familiar, mounting dimensions and hole layouts can vary by manufacturer and model. The instructions tell you:
- Which mounting options are allowed
- Required dimensions
- Hole locations
- Arm orientation
- Adjustment points
- Handing considerations
In Alex’s example, the first step is locating the required dimension for the closer body placement. He references the template dimension and lays out the closer based on that measurement.
That is exactly how it should be done.
Step 2: Lay out the closer body location
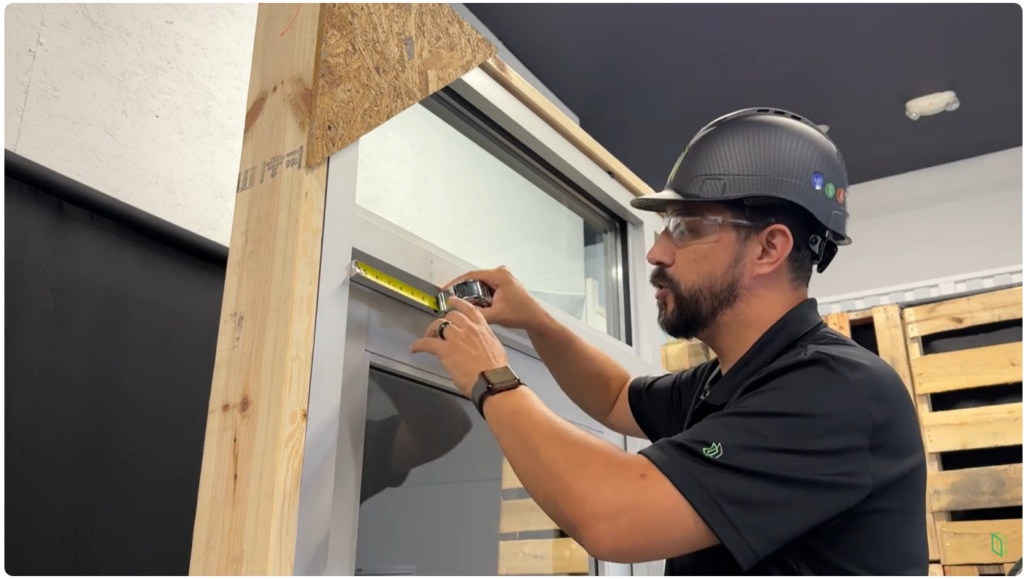
For the top jamb installation shown in the video, Alex first measures and marks the required dimension across the frame.
He measures 6-1/2 inches, creates a guide line, centers the closer body on that line, and lightly marks the holes with a pencil.
That layout step matters more than people think.
If the closer body is off-center or the holes are marked poorly, you can create problems with:
- Arm geometry
- Door control
- Fastener alignment
- Final appearance
This is one of those moments where slowing down for a minute saves time later.
Best practices during layout:
- Measure from the correct reference point shown on the template
- Mark lightly first before drilling
- Confirm center alignment
- Double-check handing and arm orientation
- Make sure the closer body will clear surrounding conditions
Step 3: Pre-drill the mounting holes
Once the body location is marked, the next move is to pre-drill the holes.
Pre-drilling makes installation easier and helps keep the closer body aligned as you fasten it down. It also reduces the chance of screws wandering or binding during install.
This is especially helpful when you want a cleaner, more controlled hardware install.
When pre-drilling:
- Use the correct bit size for the fasteners provided
- Keep the drill square to the surface
- Do not oval out the holes
- Clear chips so the fastener seats properly
It is a small step, but it makes the rest of the install go smoother.
Step 4: Install the closer body
With the holes pre-drilled, install the closer body to the frame.
At this point, the focus is straightforward: get the closer body secured firmly and positioned exactly where it needs to be.
Things to check as you fasten it down:
- The body sits flat
- Fasteners pull in evenly
- The closer does not shift during tightening
- The body orientation matches the template
A closer that is slightly crooked can affect the arm setup and make the final install look sloppy, even if the door still functions.

Step 5: Measure for the arm shoe or arm mounting point
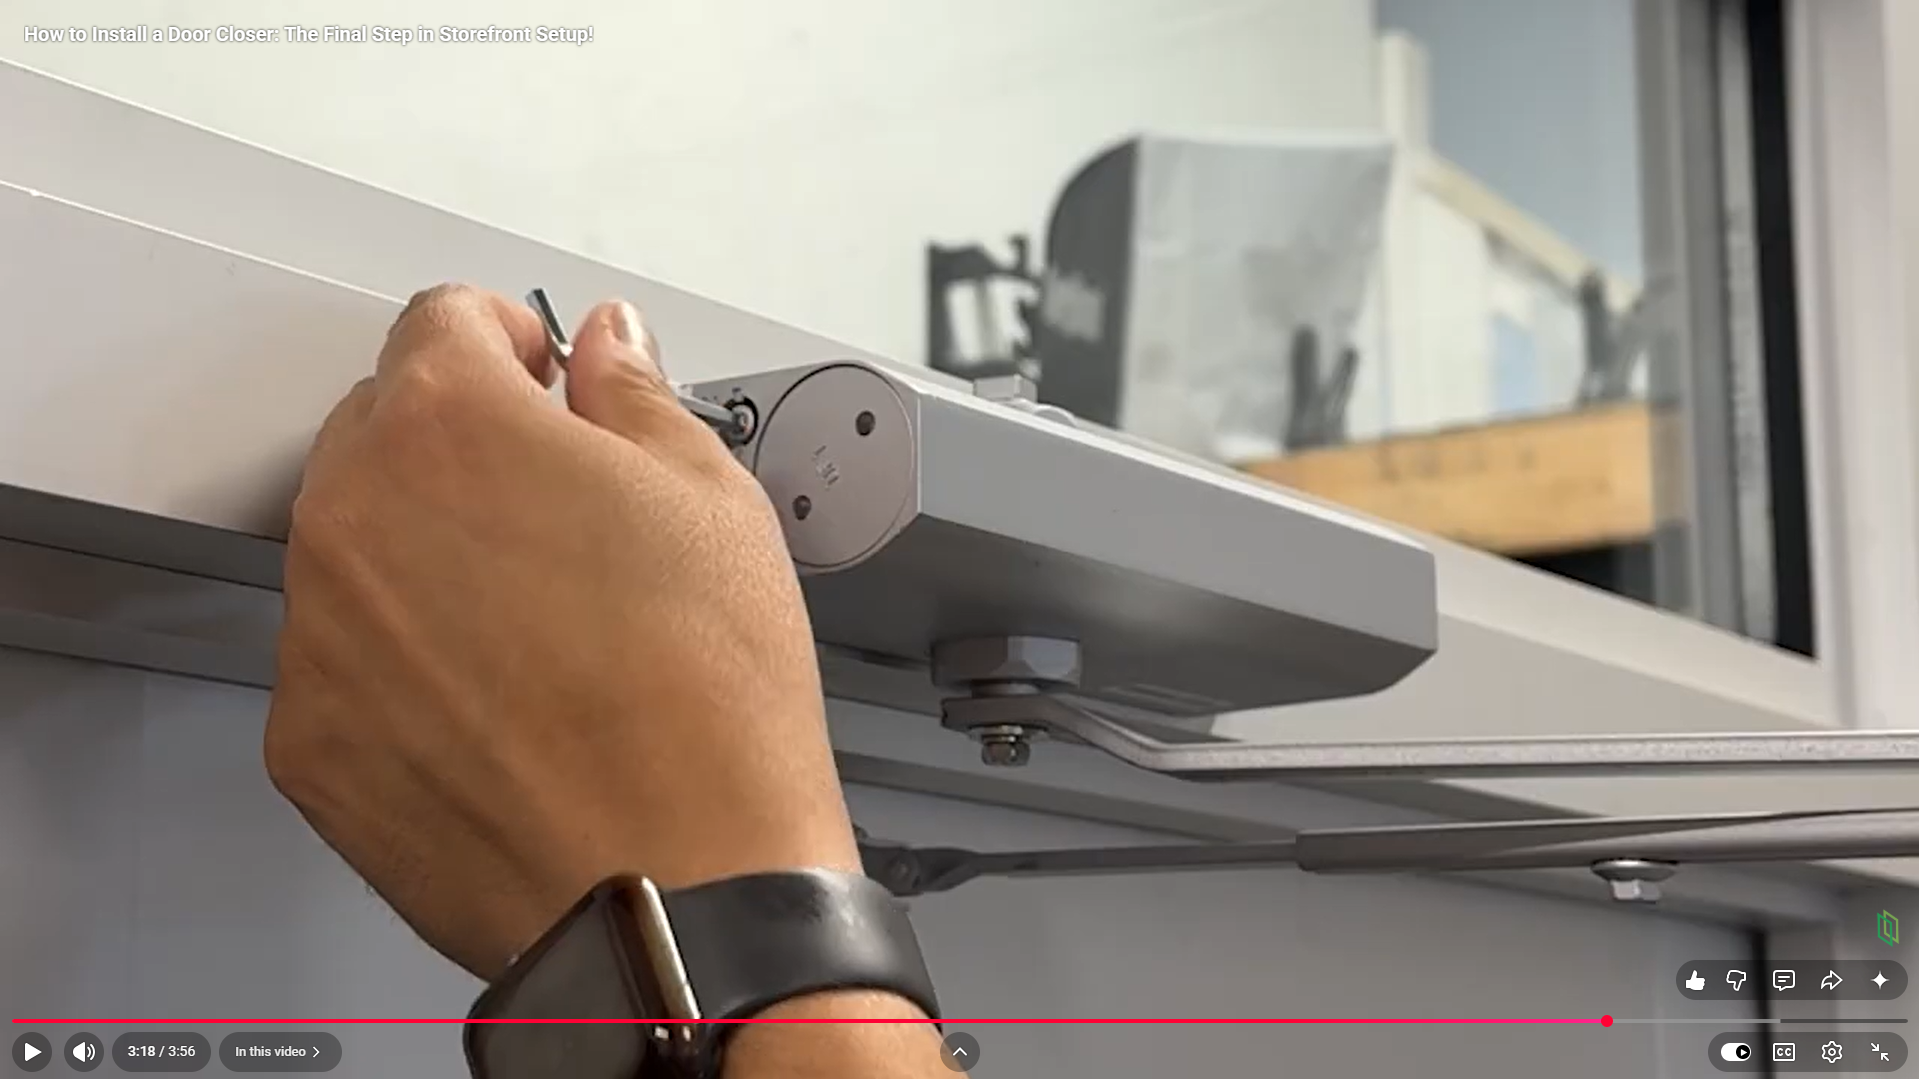
After the body is installed, Alex measures 1 inch down, marks a line, then brings the arm into place and marks the next set of holes.
This is the second critical layout point in the install.
The arm needs to be positioned correctly so the closer can operate through the intended range and deliver the right closing action. Bad arm placement creates bad closer performance.
That can lead to:
- Weak closing force
- Improper latch action
- Binding
- Unusual arm position
- Poor final appearance
As with the closer body, mark carefully and confirm the arm position before drilling.
Step 6: Pre-drill and install the arm components
Once the arm location is marked, pre-drill those holes and install the arm components.
From there, the remaining mechanical work is usually straightforward. The main goal is to get the arm connected and aligned according to the manufacturer’s instructions, then tighten the final fasteners securely.
Alex finishes this step by tightening the screw at the lower part of the arm assembly, which completes the hardware installation.
At that point, the closer is physically installed.
But the job is not done yet.
How to adjust sweep and latch speed
This is where a lot of field installs go wrong.
Many installers can mount the closer, but fewer take the time to dial it in properly. The result is a door that technically closes but does not perform the way it should.
In the video, Alex points out the two key adjustment areas:
- Closing speed, also called sweep
- Latch speed
These two adjustments control how the door travels from open to nearly closed, and then how it finishes the final part of the closing cycle.
Sweep speed
Sweep is the main closing motion through the larger arc of the door swing.
This portion should feel controlled and smooth, not fast and aggressive.
Latch speed
Latch speed controls the final portion of the closing cycle, where the door moves into the frame and latches.
This portion needs enough force to close and latch the door, but not so much that it slams.
The 5-to-7-second rule
In the video, Alex explains the target clearly: the door should close in no less than 5 seconds and no more than 7 seconds.
He also notes that you should divide that total time roughly in half between the sweep and latch portions.
That is a helpful training benchmark because it gives newer installers something measurable to work toward.
Instead of adjusting blindly, they can watch the door and ask:
- Is it closing too fast overall?
- Is the sweep too aggressive?
- Is the latch too soft?
- Is the latch too fast?
- Does it meet the time target?
That is how you move from “it works” to “it is adjusted properly.”

What a good closer adjustment looks like
A properly adjusted closer should:
- Close the door smoothly
- Avoid slamming
- Latch reliably
- Feel controlled through the full cycle
- Meet the recommended closing time
A poorly adjusted closer usually shows itself quickly.
Common signs of bad adjustment:
- Door slams shut
- Door drags out and never latches
- Door closes too slowly
- Door stops short of latch
- Door feels jerky or inconsistent
If any of that is happening, go back to the adjustment valves and fine-tune the sweep and latch speeds.
Common door closer installation mistakes
Choosing the wrong mounting method
Not every closer setup works for every door. Narrow stile doors, pull-side conditions, and appearance requirements all matter.
Rushing the layout
Bad measurements at the start create problems the whole way through. Clean layout work makes everything easier.
Skipping pre-drilling
This can lead to wandering screws, poor alignment, and a less professional install.
Improper arm positioning
If the arm geometry is wrong, closer performance suffers.
Ignoring adjustment
A mounted closer is not a finished closer. Adjustment is part of the installation.
Focusing only on appearance
Yes, some mounting methods look cleaner. But function still has to come first.
Where this fits into storefront training
This kind of task is exactly why mock-ups and hands-on training matter.
A storefront closer install is not the most complex thing in the glazing world, but it pulls together several skills that matter across the trade:
- Reading manufacturer instructions
- Measuring accurately
- Laying out hardware
- Drilling cleanly
- Installing components properly
- Making functional adjustments
- Understanding how one piece affects the whole opening
For newer glaziers, project managers, and office staff trying to understand entrance systems better, this kind of training has real value. It helps connect product knowledge with field application.
Free commercial door closer installation checklist
Door closers are one of those finish details that reveal whether an entrance was truly completed with care.
The hardware may be small compared to the framing, glass, and door itself, but its impact is obvious every time someone uses the opening.
If you take anything away from Alex’s walkthrough, it should be this:
- Pick the right mounting method for the application
- Follow the manufacturer template
- Lay everything out carefully
- Pre-drill before mounting
- Install the arm correctly
- Adjust sweep and latch speed with intention
Do that, and you end up with more than just a completed opening. You end up with a door that feels right, works right, and reflects the kind of detail-oriented work good glaziers are known for.
Want a simple field reference for your next entrance install?
Download the free Commercial Door Closer Installation Checklist to walk through mounting selection, layout, drilling, arm installation, and final closer adjustment. A practical resource for new installers, shop training, internal mock-up work, and anyone who wants a cleaner, more repeatable install process.
Ready to learn more?
Get your crew up to speed before your next job eats your margin. We’ve got the cheat sheets, the courses, and the field-tested know-how. Free. LearnGlazing.com.

Watch the Video on Youtube
(Open Youtube in New Tab.)

Commercial Door Closer Installation Training Checklist
(Download Full PDF)
