
Mastering Glass Inspection: Identifying and Handling Flaws | LearnGlazing.com
When it comes to discussing glass flaws, I find myself having the same conversations over and over again.
You wouldn’t expect it, but for whatever reason, glass industry practitioners and building owners tend to have strong opinions about glass flaws. In particular, the following issues tend to be contentious:
- When is a flaw considered minor and when should glass be replaced?
- What is the right way to inspect glass?
- What is the best way to have a conversation about glass flaws with building owners?
These are all really important issues that come up repeatedly, so I thought I should take the time to address them and provide my input, based on my experience, on the subject of inspecting glass for flaws.
But before jumping in, we should first define what exactly we’re looking for when we talk about flaws. To keep things simple, I’ll separate glass flaws into three categories:
- Inherent
- Fabrication
- Handling
A quick note: If you would like to learn more about each of these categories and specific types of flaws, then make sure to check out our course on “Common Glass Defects” where we dive deeper into each one with examples for you to see.
Now let’s take a closer look at each category.
Inherent flaws result from the manufacturing process. As glazing professionals, these are usually out of our control. And, although glass manufacturers do everything in their power to prevent them, they are fairly common. These include flaws like seeds, rubs, and inclusions.
Manufacturers and fabricators share the responsibility of identifying these flaws. However, it is almost impossible for manufacturers to inspect every inch of each pane, so the brunt of the responsibility ultimately falls on the fabricators. A piece of glass passes through more than a few hands in these shops, so this is the best opportunity to catch inherent flaws. Typically, manufacturers support their fabricators and share in bearing the costs when an inherent flaw is discovered during fabrication.
The next type is fabrication flaws. Yes – unfortunately for fabricators, they are implicated in more than one type of glass flaw. As a piece of glass is transformed from a flat pane into a complex component with holes and notches, it is not uncommon for it to get damaged. In fact, the more people or processes involved in fabrication, the greater the odds of some form of damage occurring. This flaw category includes by far the most extensive list of flaws, from bad breakouts to missed spots on polishing, to bow and roller wave distortion, and more. There are quite a few things that can go wrong in fabrication.
Unsurprisingly, it is ultimately the fabricator’s responsibility to deal with fabrication flaws. Every fabricator needs to have solid Quality Control (QC) processes in place following American Society for Standards and Testing (ASTM) standards. These include:
- ASTM – C1036 – Standard for flat glass
- ASTM – C1048 – Standard for heat-treated and tempered glass
- ASTM – C1172 – Standard for laminated glass
- ASTM – E2190 – Standard for insulated glass performance and evaluation
However, following ASTM standards is really a minimum requirement because these standards are not always good enough to meet the needs of some customers with very specific needs or higher expectations. It’s important to recognize that these standards were written by experts in the glass industry, and some would argue that they are a bit biased and sometimes set the bar too low. Usually, fabricators are willing to take extra steps beyond what’s required by the standards to ensure the highest-quality products.
Last but not least, are flaws that we call “oops” or handling flaws. As the name implies, these are flaws that result from a mistake somewhere along the line from fabrication to installation. They can happen at any time and anywhere and are some of the hardest to resolve. Included in this category are chips, shells, and light or heavy scratches.


Now that we have a basic understanding of the various types of glass flaws and how they occur, let’s circle back to our original questions:
- When is a flaw considered minor and when is it a deal breaker?
- How should glass be properly inspected?
- How should I have a conversation about flaws with a building owner?
What flaws are acceptable and what flaws are deal breakers?
I’ll start with the bad news: there’s no black-and-white answer to this question. The answer depends on several factors, like what the glass is going to be used for and what quality standards are expected.
The first thing to consider is whether the flaw makes the piece of glass unsafe for use. Any structural flaw that makes the glass unsuitable for safe application is a deal breaker. However, visual flaws are often acceptable, especially when the flaw is small compared to the size of the pane, and particularly when the glass is installed far from any potential viewer.
ASTM standards tell us to examine glass in its final application, not up close and personal with a magnifying glass and a flashlight. For example, a small scratch may be deemed unacceptable if it’s right at eye level on a glass door or a bathroom mirror, but on the other hand, a large scratch could be perfectly acceptable if it’s on a piece of glass installed 50 feet in the air in a spandrel unit.
Similarly for chips – the edge of a door is highly visible, so a chip there may not be acceptable. But if the glass is installed in a channel that conceals the chip, it could be a perfectly acceptable flaw (as long as it’s considered safe). The same reasoning can be applied to other visual flaws such as debris and laminating bubbles.
This leads us naturally into our second question.
How should I inspect glass? What tools will I need?
As briefly mentioned above, the inspection process should be carried out in a manner that mimics the final use or setting of the glass. Pieces that will be viewed up close should be scrutinized more closely than pieces that make up a canopy or a skylight, for instance.
The following is list of helpful tools you’ll want to have on hand:
- An “A” frame or cart that you can put the piece on for inspection
- A flashlight
- A large sheet of cardboard or a black-and-white sheet to put behind the glass (this is necessary for any spandrel applications and any glass that is to be mounted to a wall with no light coming through)
- Paper for drawing a diagram
- A ruler to measure the size of the flaw
With these tools, you have everything you need to make a sound judgment. Simply follow the steps below to conduct the inspection:
- Clean the piece as best you can. Use a microfiber cloth and glass cleaning solution.
- Place the piece in a setting that is as similar as possible to its final installation setting. Pay special attention to the lighting to make sure it’s similar to where the glass will be installed.
- Inspect the piece from a distance and angle that mimics how building occupants or passersby will view the glass. Inspect the glass using only your eyes – no special instruments. Take note of any flaws that are visible from your perspective. See the image below for details.

- Take note of the number and location of any flaws. Notice in the images below that the size of the piece of glass plays an important role in other variables such as the size of the viewing area, the border, and the sightline. It also affects how many minor defects are acceptable. For a large piece, you could tolerate up to 3 defects, but for a small piece, these 3 defects would be too noticeable.


Now that we’ve covered how to inspect glass, we’re ready to move on to our last question.
How to approach a conversation about glass flaws with a building owner
In my view, this is the most important part of this article and more broadly the topic of dealing with glass flaws.
Say that you’ve found a flaw, but the flaw is minor in your view and the glass is still usable. Unfortunately, the building owner might not share your opinion. It’s time to have a difficult conversation.
In my experience, more often than not, building owners understand that product flaws happen and are inevitable. They’re used to minor problems cropping up in framing, masonry, plumbing, electrical, you name it. Glass and glazing are no exception. They’re used to making tough decisions.
Put yourself in their position: is the flaw severe enough to justify replacing the piece or offering some kind of alternate solution? What would you think if you were the building owner?
Imagine you’re in the market for a new car. You picked out the one you wanted and called up the dealer to reserve the car. Maybe you even committed to a down payment. But before finalizing the sale, the dealer calls you up to tell you about an incident that resulted in a scratch on the car you are about to buy. Would you still agree to pay full price for the car? It probably depends on the location of the scratch. A scratch on the hood is a bigger deal than a scratch on the bottom of the bumper. But, either way, you would probably feel a bit cheated if the dealer didn’t offer you some kind of solution to make up for it.
Back to glass flaws – if you suspect a flaw is going to be an issue, it’s always a good idea to think proactively and come up with a potential solution before you begin the conversation. Find out how long it might take to replace the part. Find out what your supplier could do, if anything, to help out. You could also consider offering the building owner a discount on a future job.
All of this is going to cost you extra time and money, but it’s important to weigh this small loss against your customer’s satisfaction with your work. Most of the time it’s worth putting in the extra effort to keep your customers happy.
As a contractor, you’re at the mercy of fabricator timelines and product availability, so you need to be a bit flexible. It’s best in my view to take responsibility, even if you didn’t cause the flaw, and work proactively to solve the problem. If you’re honest, direct, and patient, your customers will recognize this and your business will benefit from a strong reputation.
It takes 20 years to build a reputation and five minutes to ruin it.
– Warren Buffett
Hungry for more intel on identifying and handling glass flaws?
You’re in luck – we offer free training and a comprehensive course on glass defects. Join now for free to build your knowledge base and become an expert on dealing with glass flaws.
But that’s not all! Don’t leave before checking out our Glass Inspection Cheat Sheet. You can read it below or click here to download a PDF version to keep handy in your office.
Cheat Sheet for Glass Inspectors
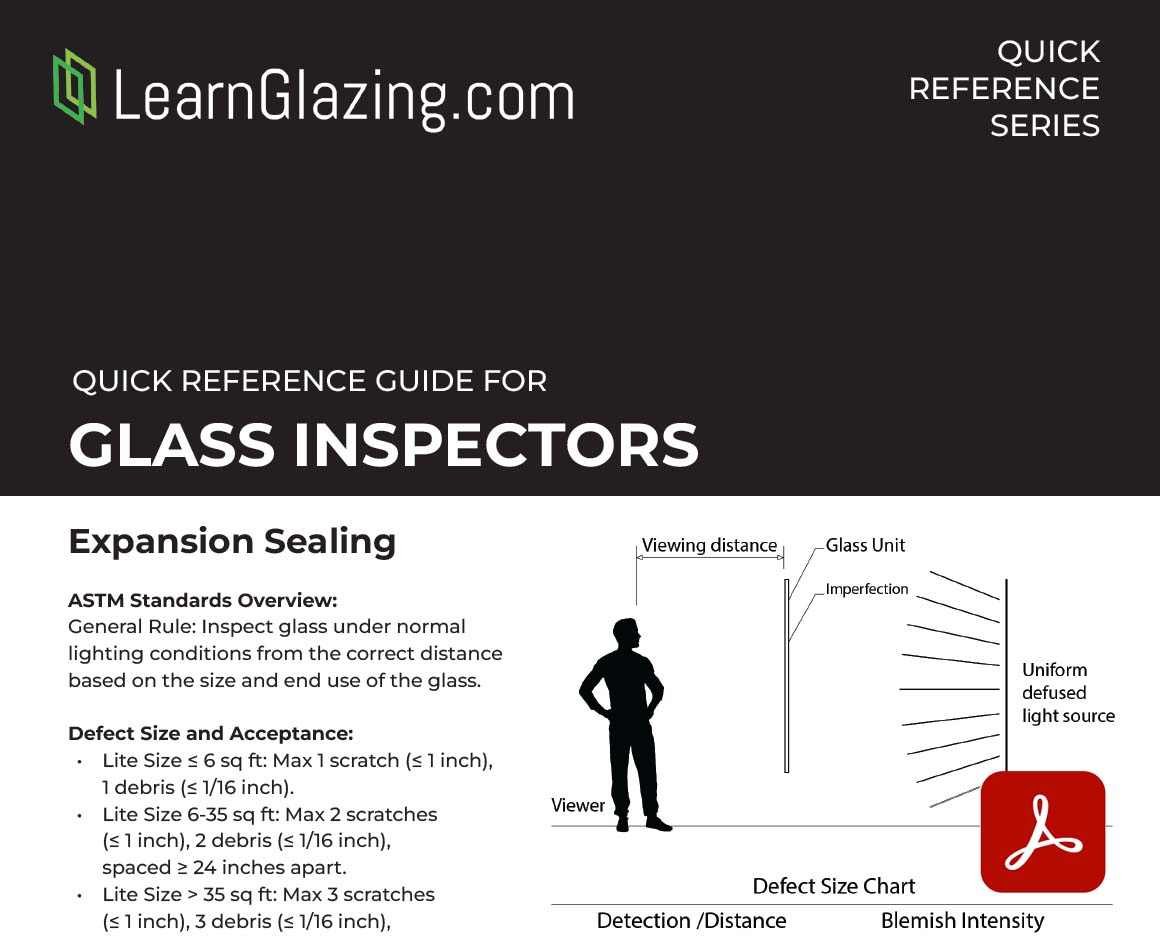
ASTM Standards Overview:
- General Rule: Inspect glass under normal lighting conditions from the correct distance based on the size and end use of the glass.
- Defect Size and Acceptance:
- Lite Size ≤ 6 sq ft: Max 1 scratch (≤ 1 inch), 1 debris (≤ 1/16 inch).
- Lite Size 6-35 sq ft: Max 2 scratches (≤ 1 inch), 2 debris (≤ 1/16 inch), spaced ≥ 24 inches apart.
- Lite Size > 35 sq ft: Max 3 scratches (≤ 1 inch), 3 debris (≤ 1/16 inch), spaced ≥ 24 inches apart.
- Chips and Shells: Size limits vary, generally ≤ 1/8 inch from edge.
Glass Inspection Procedure:
- Clean glass surface before inspection with a microfiber cloth and glass cleaning solution.
- Use an appropriate background (e.g., black/white sheet) behind the glass for proper visibility.
- Inspect the glass in the intended installation environment (indoor/outdoor).
- Measure and document flaws with a ruler and create a diagram.
For comprehensive guidelines, refer to the ASTM standards:
Don’t leave before checking out our Glass Inspection Cheat Sheet. You can read it below or click here to download a PDF version to keep handy in your office.